From install to your first Sunday
Six steps, in the order worth doing them: from installing the plugin to the Sunday your volunteers get the email and confirm their shift. One afternoon is enough.
What to have to hand
- A WordPress 6.0 or later site running PHP 8.0 or later, and an administrator account to install with.
- The plugin .zip file: you download it from your account after buying or starting the trial.
- The list of roles your church needs and your volunteers’ email addresses. You don’t need them all up front — you can add people whenever you like.
Church Pilot lives inside your own WordPress: it doesn’t move contacts or attendance onto someone else’s platform, and your data stays on your hosting.
Upload the plugin and activate your license
In WordPress: Plugins → Add New → Upload Plugin, pick the .zip file, press Install Now and then Activate. A Church Pilot item appears in the sidebar.
The first time you open it, a welcome tutorial starts on its own and walks you through the same steps as this page. You can close it and reopen it any time from Settings → General → Review the tutorial.
- Until the license is active, the pages show a panel to activate it or to start the trial. License, renewals and invoices are managed from Church Pilot → Subscription.
- If you change plan, go back to Subscription and press Sync license: the site keeps the previous plan in memory until you ask it to check.
Roles first — everything else builds on them
Go to Church Pilot → Roles & groups and create the roles that actually exist in your church: Singer, Sound engineer, Welcome, Projection… Then group them: Worship, Tech, Welcome.
- Groups aren’t organisational decoration: they let you email the whole tech team at once, decide who can see a setlist, and set an arrival time earlier than the start of the service — sound people come before the welcome team.
- A role can belong to more than one group. Start with a handful of real roles: adding another one later takes seconds.
Then services: the things that come round every week
In Church Pilot → Services you describe the recurring appointments — Sunday service, Evening service, Worship rehearsal — each with its usual time, a colour and the roles it needs.
This is the step that saves the most time later: when you create a shift, the service brings its time and its roles with it, and all you have to add are the names. The colour is what will let you read a whole month at a glance.
Your volunteers, with their email address
In Church Pilot → Team you add people: first name, last name, email, and the roles they can cover.
- Church Pilot creates the WordPress user if that email doesn’t have one yet. You never go through Users → Add New.
- The link between a volunteer and their account is the email address: change it on the member’s record and the account stays attached.
- No per-volunteer cost: one license covers the whole church, however many of you there are.
Create the shift and assign people
In Church Pilot → Calendar you click a day, pick the service and fill each role. Everyone you add gets an email with the date, time, role and arrival time if the group has one.
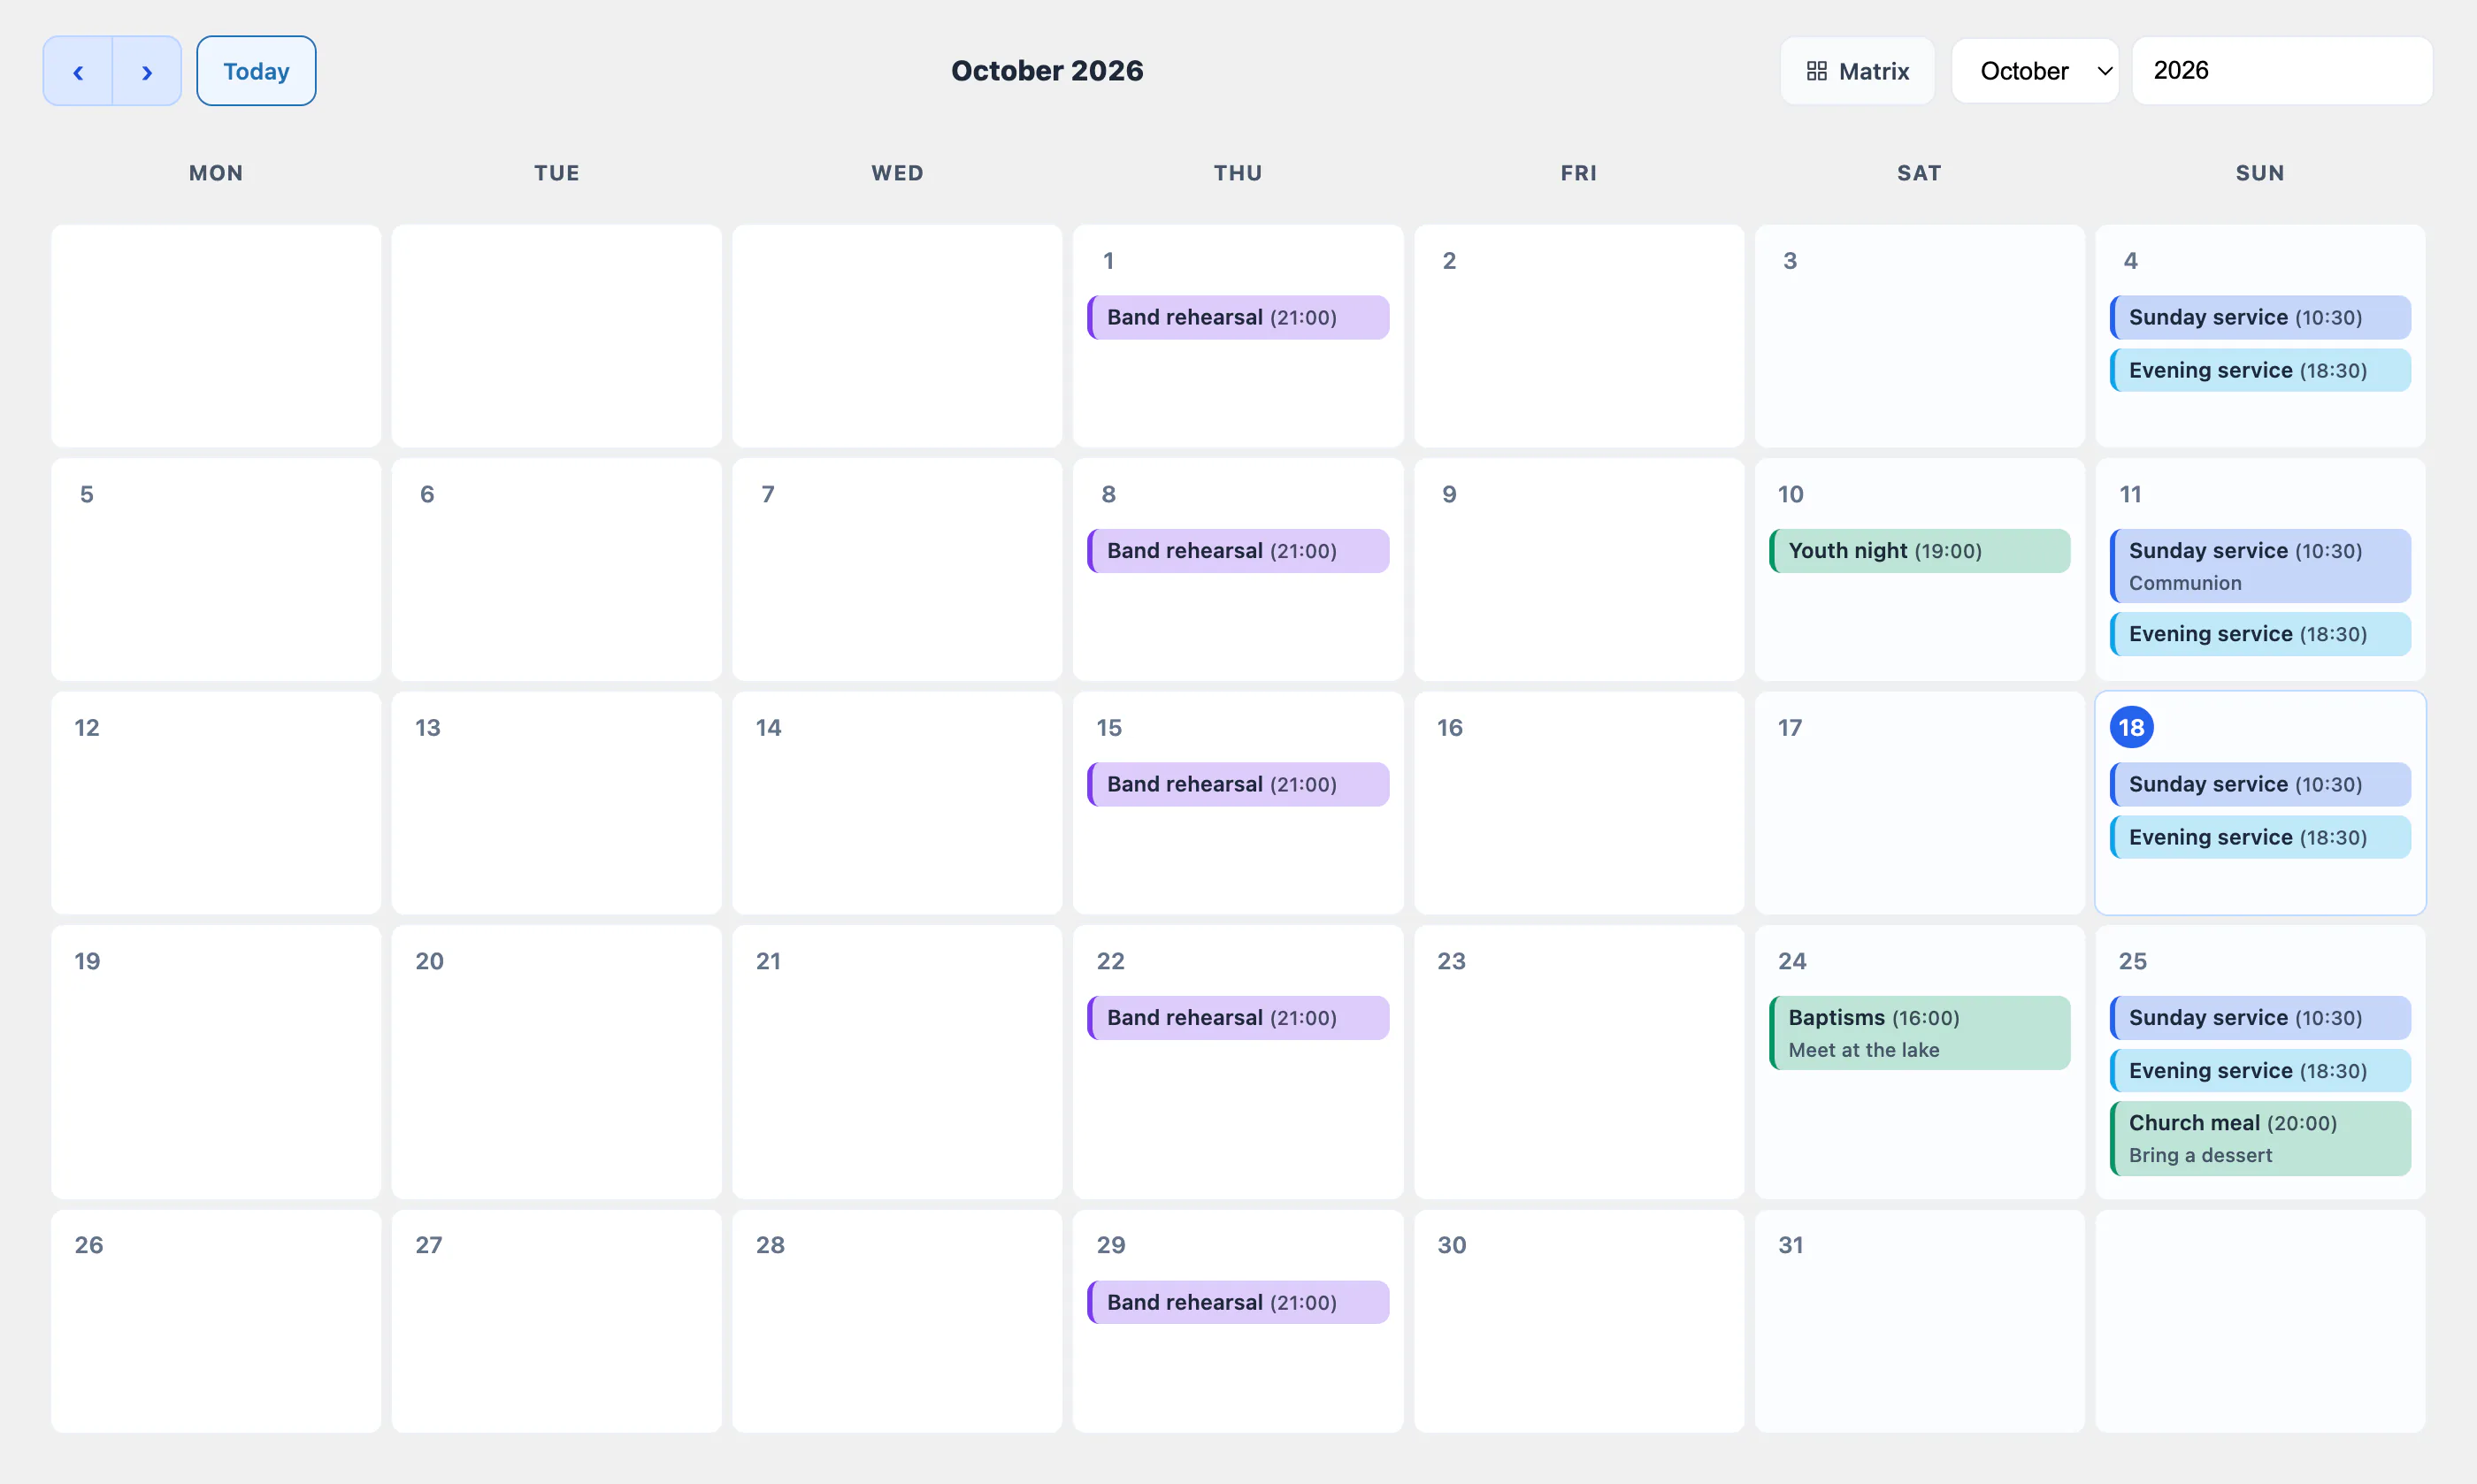
Scroll the image to see all of it.
- If a volunteer has declared a scheduled absence covering that day, their name tells you while you’re picking. It’s a warning, not a block: the call stays yours.
- Shifts are born here, in the calendar. Who is assigned to them you can also change from the Matrix view, the next step, without coming back.
See whether the coming weeks hold together
The calendar answers “what happens on that day”. The Matrix view answers the opposite question, the one that keeps you awake: are the next shifts covered? Roles down the side, upcoming shifts across the top — and the gaps show up because they’re empty cells.
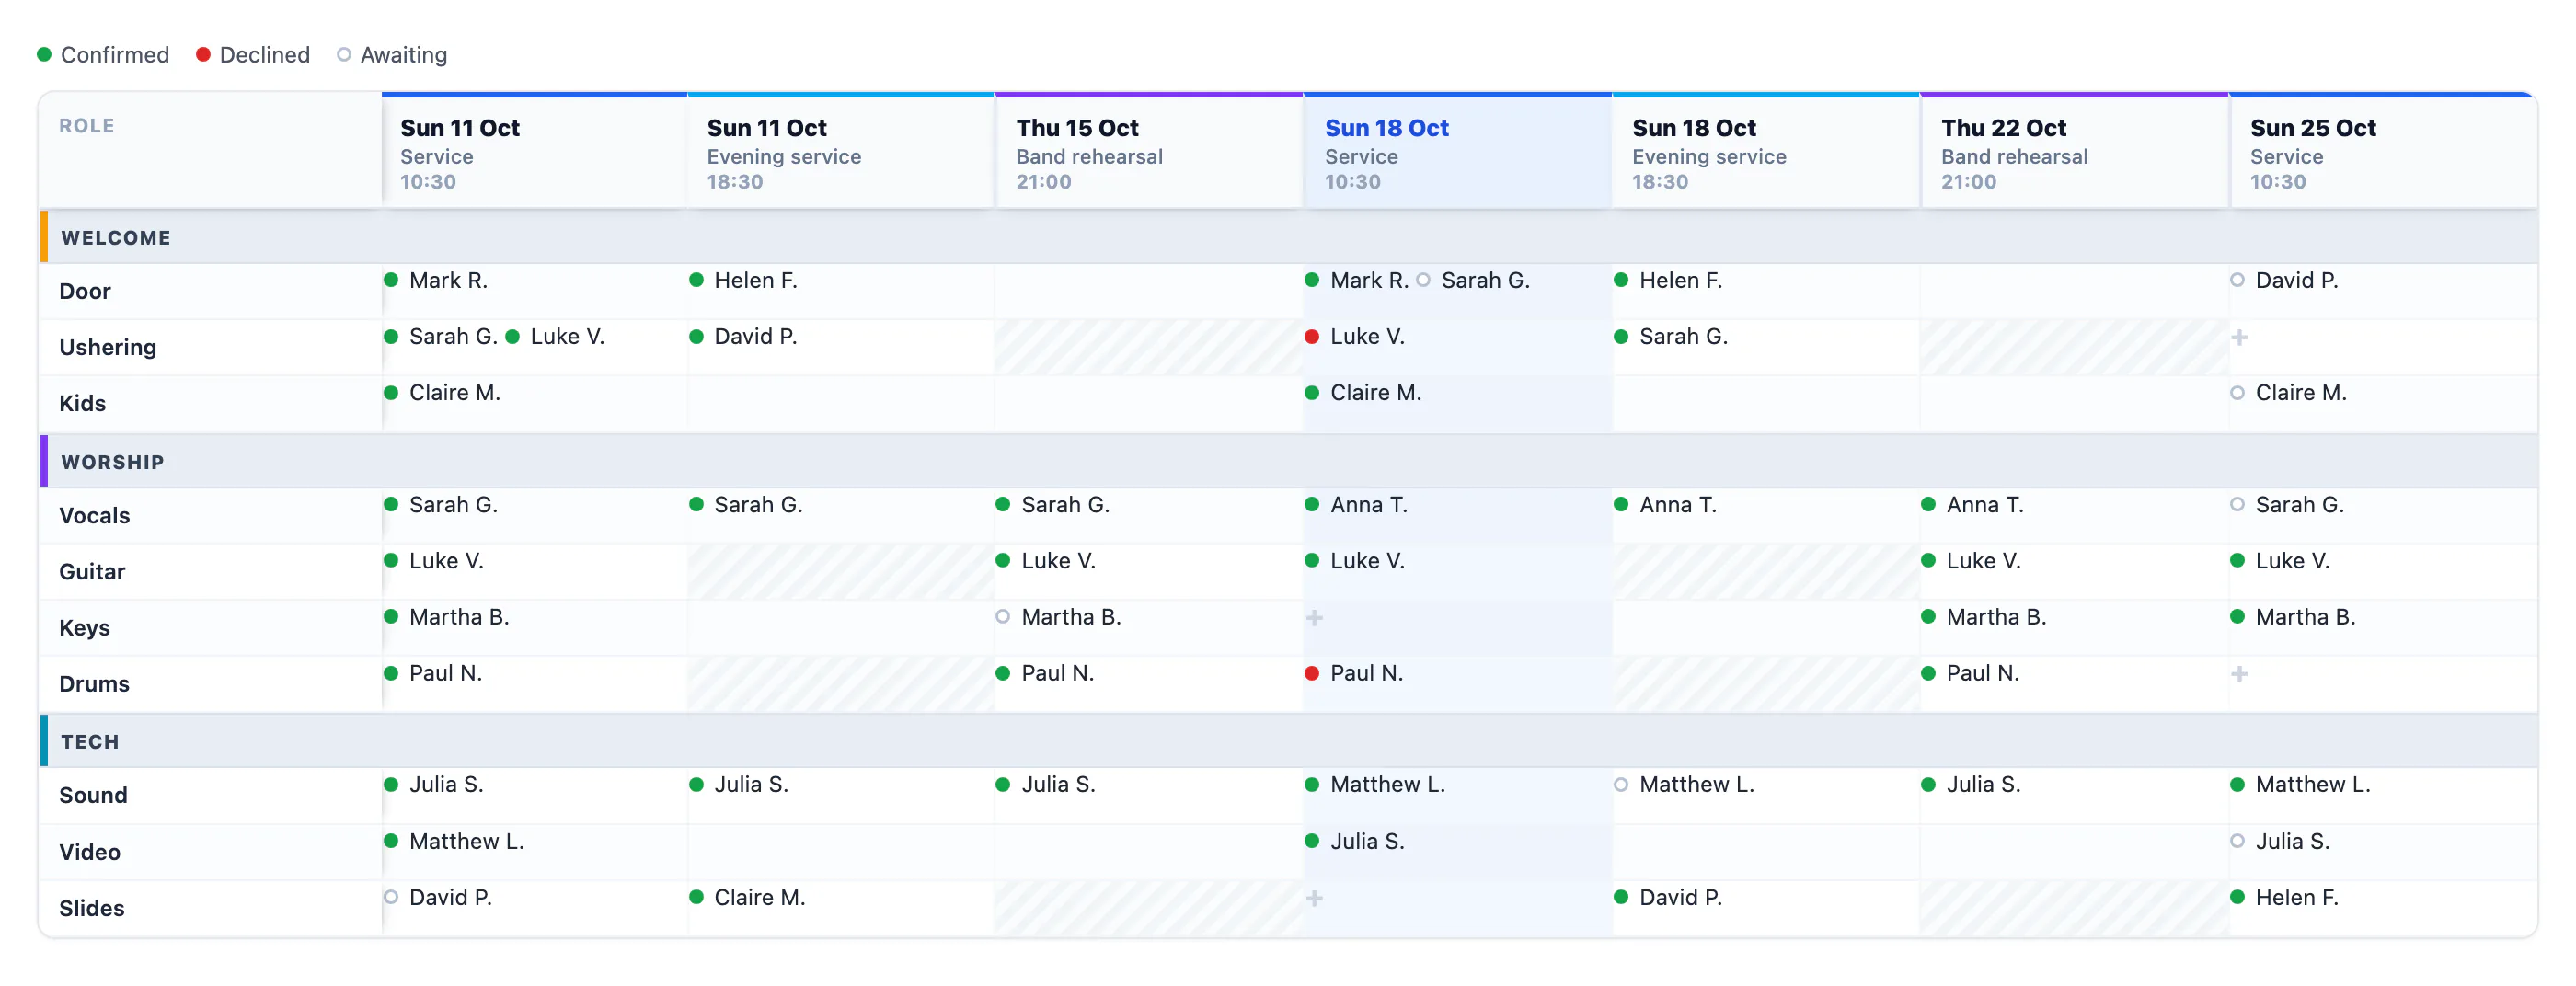
Scroll the image to see all of it.
Click a cell and assign from there, without changing page. Under Confirmations you can instead see who hasn’t replied yet and send them a reminder.
What a volunteer sees
Someone who isn’t an administrator finds a single page when they log in: My services. Their shifts, not everyone’s.
- They confirm with one tap, straight from the shift card — and that answer is what becomes the dot in your Matrix.
- They declare their scheduled absences (a holiday, a trip away) and you see them while you’re assigning.
- They find the setlist for the shift, if the worship team has prepared one, and can sync their shifts to their own calendar (iPhone, Google Calendar) from the Sync button.
The rest switches on from Settings
You don’t have to decide everything on day one. These modules turn on when your church needs them, from Church Pilot → Settings.
- Songs & Setlists — a song library with lyrics and chords, setlists attached to the shift, live key transposition.
- Communications — email everyone, a group or a role, and schedule it if you want.
- iCal calendar — the feed each volunteer adds to their own phone.
- Conferences — public registration and QR check-in. Requires the Plus plan.
- Library and Register — book table, stock and point of sale. Requires the Pro plan.
Under Preferences you can also simplify the back end for volunteers: hide the WordPress dashboard and drop them straight onto “My services” when they log in.
The three things that actually happen
- The emails aren’t arriving. Church Pilot sends them with WordPress’s standard function, which on many hosts lands in spam. For production, use a sender on your own domain and an SMTP service: that’s a site setting, not a plugin one.
- I changed plan and the modules are still locked. Go to Subscription and press Sync license.
- A volunteer can’t see their shifts. Check that the email on their Team record is the same one they log in with: that’s what ties the two together.
The screenshots on this page show sample data: names, contact details and figures are entirely made up, for illustration only. Any resemblance to real people is coincidental.
Try it on your next Sunday
Thirty days of trial on the Starter plan: install it, set up roles, services and team, and assign your first real shift.